> ## Documentation Index
> Fetch the complete documentation index at: https://nova.laravel.com/docs/llms.txt
> Use this file to discover all available pages before exploring further.
# Menus
> Nova menus provide a convenient way to customize the main and user menus.
## Overview
By default, Nova's main left-side navigation menu displays all of your application's dashboards, resources, and any custom tools you have registered.
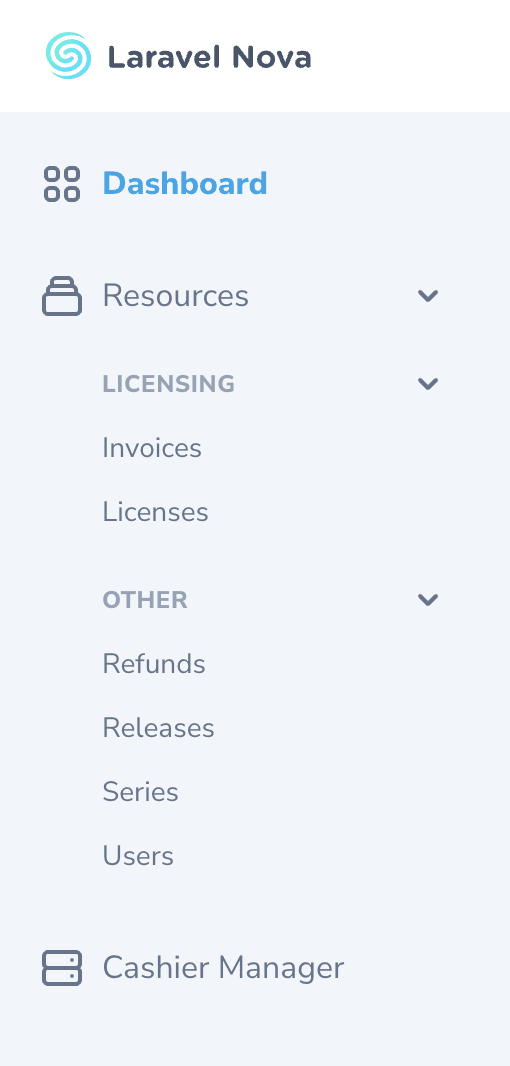 When rendering the main menu, Nova will order your dashboards according to the order in which they are returned by the `dashboards` method within your application's `App\Providers\NovaServiceProvider` class.
Nova will also automatically group your resources under the default "Resources" menu section according to the [`group` property defined in the `Resource` class](./../resources/the-basics#grouping-resources). In addition, any custom tools you have registered will be listed in the order they are defined within your application's `NovaServiceProvider`.
### Customizing the Main Menu
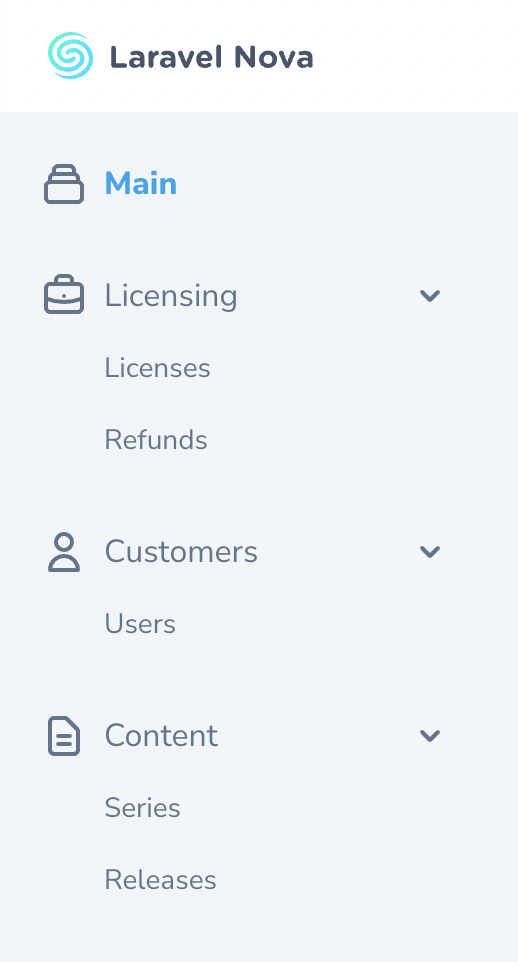
While Nova's default main menu is sufficient for most applications, there are times you may wish to completely customize the menu based on your own preferences. For that reason, Nova allows you to define your own main menu via the `Nova::mainMenu` method. Typically, this method should be invoked within the `boot` method of your application's `App\Providers\NovaServiceProvider` class:
```php app/Providers/NovaServiceProvider.php theme={null}
use Illuminate\Http\Request;
use Laravel\Nova\Menu\Menu;
use Laravel\Nova\Menu\MenuItem;
use Laravel\Nova\Menu\MenuSection;
use Laravel\Nova\Nova;
// ...
/**
* Bootstrap any application services.
*/
public function boot(): void
{
parent::boot();
Nova::mainMenu(function (Request $request) {
return [
MenuSection::dashboard(Main::class)->icon('chart-bar'),
MenuSection::make('Customers', [
MenuItem::resource(User::class),
MenuItem::resource(License::class),
])->icon('user')->collapsable(),
MenuSection::make('Content', [
MenuItem::resource(Series::class),
MenuItem::resource(Release::class),
])->icon('document-text')->collapsable(),
];
});
}
```
When rendering the main menu, Nova will order your dashboards according to the order in which they are returned by the `dashboards` method within your application's `App\Providers\NovaServiceProvider` class.
Nova will also automatically group your resources under the default "Resources" menu section according to the [`group` property defined in the `Resource` class](./../resources/the-basics#grouping-resources). In addition, any custom tools you have registered will be listed in the order they are defined within your application's `NovaServiceProvider`.
### Customizing the Main Menu
While Nova's default main menu is sufficient for most applications, there are times you may wish to completely customize the menu based on your own preferences. For that reason, Nova allows you to define your own main menu via the `Nova::mainMenu` method. Typically, this method should be invoked within the `boot` method of your application's `App\Providers\NovaServiceProvider` class:
```php app/Providers/NovaServiceProvider.php theme={null}
use Illuminate\Http\Request;
use Laravel\Nova\Menu\Menu;
use Laravel\Nova\Menu\MenuItem;
use Laravel\Nova\Menu\MenuSection;
use Laravel\Nova\Nova;
// ...
/**
* Bootstrap any application services.
*/
public function boot(): void
{
parent::boot();
Nova::mainMenu(function (Request $request) {
return [
MenuSection::dashboard(Main::class)->icon('chart-bar'),
MenuSection::make('Customers', [
MenuItem::resource(User::class),
MenuItem::resource(License::class),
])->icon('user')->collapsable(),
MenuSection::make('Content', [
MenuItem::resource(Series::class),
MenuItem::resource(Release::class),
])->icon('document-text')->collapsable(),
];
});
}
```
 ### Customizing the User Menu
Nova also allows you to customize the "user" menu found in the top-right navigation area. You can customize Nova's user menu by calling the `Nova::userMenu` method. This method is typically invoked within the `boot` method of your application's `App\Providers\NovaServiceProvider`:
```php app/Providers/NovaServiceProvider.php theme={null}
use Illuminate\Http\Request;
use Laravel\Nova\Menu\Menu;
use Laravel\Nova\Menu\MenuItem;
use Laravel\Nova\Nova;
// ...
/**
* Bootstrap any application services.
*/
public function boot(): void
{
parent::boot();
Nova::userMenu(function (Request $request, Menu $menu) {
if ($request->user()->subscribed()) {
$menu->append(
MenuItem::make('Subscriber Dashboard')
->path('/subscribers/dashboard')
);
}
$menu->prepend(
MenuItem::make(
'My Profile',
"/resources/users/{$request->user()->getKey()}"
)
);
return $menu;
});
}
```
By default, Nova is configured to display a "logout" link in the user menu. This link may not be removed.
Nova's user menu only supports `MenuItem` objects. Using `MenuSection` or `MenuGroup` inside the user menu will throw an `Exception`.
### Appending / Prepending to the Menu
You may call the `append` and `prepend` methods on a `Menu` instance to prepend or append new items to the. These methods are typically most helpful when customizing the user menu, since you often do not want to completely replace the existing menu:
```php app/Providers/NovaServiceProvider.php theme={null}
use Illuminate\Http\Request;
use Laravel\Nova\Menu\Menu;
use Laravel\Nova\Menu\MenuItem;
use Laravel\Nova\Nova;
// ...
Nova::userMenu(function (Request $request, Menu $menu) {
return $menu
->append(MenuItem::externalLink('API Docs', 'http://example.com'))
->prepend(MenuItem::link('My Profile', '/resources/users/'.$request->user()->getKey()));
});
```
## Menu Sections
Menu sections represent a top-level navigation item and are typically displayed with an corresponding icon representing the types of items in the menu. You can create a new menu section by calling the `MenuSection::make` method. This method accepts the name of the menu section and array of menu groups / items that should be placed within the section:
```php app/Providers/NovaServiceProvider.php theme={null}
use App\Nova\Dashboards\Sales;
use App\Nova\Lenses\MostValuableUsers;
use App\Nova\License;
use App\Nova\Refund;
use App\Nova\User;
// ...
Nova::mainMenu(function (Request $request, Menu $menu) {
return [
MenuSection::make('Business', [
MenuGroup::make('Licensing', [
MenuItem::dashboard(Sales::class),
MenuItem::resource(License::class),
MenuItem::resource(Refund::class),
MenuItem::externalLink('Stripe Payments', 'https://dashboard.stripe.com/payments?status%5B%5D=successful'),
]),
MenuGroup::make('Customers', [
MenuItem::lens(User::class, MostValuableUsers::class),
]),
]),
];
});
```
Instead of displaying a list of links, you may indicate that a menu section should just be a large, emphasized link to another location. To accomplish this, you may invoke the `path` method when defining the menu section:
```php theme={null}
use Laravel\Nova\Menu\MenuSection;
// ...
MenuSection::make('Dashboard')->path('/dashboards/main');
```
For convenience, if you are only creating a menu section to serve as a large, emphasized link to a Nova dashboard, you may invoke the `MenuSection::dashboard` method:
```php theme={null}
use App\Nova\Dashboards\Sales;
use Laravel\Nova\Menu\MenuSection;
// ...
MenuSection::dashboard(Sales::class);
```
Since you will often be creating links to Nova resources, you may use the `resource` method to quickly create a link to the appropriate path for a given resource:
```php theme={null}
use App\Nova\User;
use Laravel\Nova\Menu\MenuSection;
// ...
MenuSection::resource(User::class);
```
Similarly, you may create links to Nova lenses via the `lens` method:
```php theme={null}
use App\Nova\Lenses\MostValuableUsers;
use App\Nova\User;
use Laravel\Nova\Menu\MenuSection;
// ...
MenuSection::lens(User::class, MostValuableUsers::class);
```
Menu sections that are defined as `collapsable` do not support also being a link. Calling `path` on a menu section when it's `collapseable` will result in no link being shown.
### Menu Section Icons
You can customize the icon displayed for your menu section by invoking the `icon` method when defining the menu section:
```php theme={null}
use Laravel\Nova\Menu\MenuSection;
// ...
MenuSection::make('Resources', [
// items
])->icon('briefcase');
```
Nova utilizes the free [Heroicons](https://heroicons.com/) icon set by [Steve Schoger](https://twitter.com/steveschoger). Therefore, you may simply specify the name of one of these icons when providing the icon name to the `icon` method.
### Menu Section Badges
You may add visual badges to your menu section by calling the `withBadge` method on your `MenuSection` and specifying the options for the badge:
```php theme={null}
use App\Models\Issue;
use Laravel\Nova\Menu\MenuSection;
use Laravel\Nova\Badge;
// ...
// Passing a string directly
MenuSection::make('New Issues')
->path('/resources/issues/lens/new-issues')
->withBadge('New!', 'success')
->icon('document-text');
// Passing a Laravel\Nova\Badge instance directly
MenuSection::make('New Issues')
->path('/resources/issues/lens/new-issues')
->withBadge(Badge::make('New!', 'info'))
->icon('document-text');
// Using a closure to resolve the value
MenuSection::make('New Issues')
->path('/resources/issues/lens/new-issues')
->withBadge(fn () => Issue::count(), 'warning')
->icon('document-text');
```
### Conditional Badges
Using the `withBadgeIf` method, you may conditionally add a badge only if a given condition is met:
```php theme={null}
use App\Models\Issue;
use Laravel\Nova\Menu\MenuSection;
use Laravel\Nova\Badge;
// ...
// Passing a string directly...
MenuSection::make('New Issues')
->path('/resources/issues/lens/new-issues')
->withBadgeIf('New!', 'info', fn () => Issue::count() > 0);
// Passing a Laravel\Nova\Badge instance...
MenuSection::make('New Issues')
->path('/resources/issues/lens/new-issues')
->withBadgeIf(Badge::make('New!', 'info'), fn () => Issue::count() > 0);
// Using a closure to resolve the value...
MenuSection::make('New Issues')
->path('/resources/issues/lens/new-issues')
->withBadgeIf(fn() => 'New!', 'info', fn () => Issue::count() > 0);
```
### Collapsable Menu Sections
You may make your menu sections collapsable by invoking the `collapsable` method when defining the menu section. For convenience, Nova will remember the open state for the section between requests:
```php theme={null}
use Laravel\Nova\Menu\MenuSection;
// ...
MenuSection::make('Resources', [
//
])->collapsable();
```
## Menu Groups
Sometimes you may need another logical level between your menu sections and menu items. In this case, menu groups are the perfect solution. Menu groups allow you to group menu items under their own emphasized heading:
```php theme={null}
use App\Nova\Dashboards\Sales;
use App\Nova\License;
use App\Nova\Refund;
// ...
MenuSection::make('Business', [
MenuGroup::make('Licensing', [
MenuItem::dashboard(Sales::class),
MenuItem::resource(License::class),
MenuItem::resource(License::class),
MenuItem::externalLink('Stripe Payments', 'https://dashboard.stripe.com/payments?status%5B%5D=successful'),
]),
]);
```
### Collapsable Menu Groups
You may make your menu groups collapsable by invoking the `collapsable` method on the group. For convenience, Nova will remember the open state for the group between requests:
```php theme={null}
use Laravel\Nova\Menu\MenuGroup;
// ...
MenuGroup::make('Resources', [
//
])->collapsable();
```
## Menu Items
Menu items represent the different types of links to areas inside and outside of your application that may be added to a custom Nova menu. Nova ships with several convenience methods for creating different types of menu items.
First, to create a link to an internal area of Nova, you may call the `link` factory method on the `MenuItem` class:
```php theme={null}
use Laravel\Nova\Menu\MenuItem;
// ...
MenuItem::link('Cashier', '/cashier');
```
### Resource Menu Items
Since you will often be creating links to Nova resources, you may use the `resource` method to quickly create a link to the appropriate path for a given resource:
```php theme={null}
use App\Nova\User;
use Laravel\Nova\Menu\MenuItem;
// ...
MenuItem::resource(User::class);
```
#### Filtered Resource Menu Items
To create a link to a Nova resource with a predefined filter applied, you can use the `filter` method, passing in an instance of the filter and the value it should receive. Since filters can be used with multiple resources, you must also pass a name for the menu item, since it cannot be automatically generated:
```php theme={null}
use App\Nova\User;
use Laravel\Nova\Menu\MenuItem;
use \App\Nova\Filters\NameFilter;
// ...
MenuItem::filter('Filtered Users', User::class, NameFilter::make(), 'Hemp');
```
#### Using Multiple Filters With Filtered Resource Menu Items
You may also pass multiple filters to a resource menu item. For instance, let's imagine you wanted to create a menu item that linked to your `User` resource, showing users that have an email ending in `@laravel.com` and that also have a status of `active`:
```php theme={null}
use App\Nova\User;
use Laravel\Nova\Menu\MenuItem;
use \App\Nova\Filters\EmailFilter;
use \App\Nova\Filters\StatusFilter;
// ...
MenuItem::filter('Filtered Users', User::class)
->applies(EmailFilter::make(), '@laravel.com')
->applies(StatusFilter::make(), 'active');
```
#### Passing Constructor Parameters to Filtered Resource Menu Items
Nova filters may also receive constructor parameters to enable convenient re-use of your filters across resources. To pass the parameters when creating a filtered resource menu item, just provide them to the filter's `make` method:
```php theme={null}
use App\Nova\User;
use Laravel\Nova\Menu\MenuItem;
use App\Nova\Filters\ColumnFilter;
// ...
MenuItem::filter('Active Laravel Users', User::class)
->applies(ColumnFilter::make('name'), 'Hemp');
```
### Lens Menu Items
Similar to resource items, you may create links to Nova lenses via the `lens` method:
```php theme={null}
use App\Nova\Lenses\MostValuableUsers;
use App\Nova\User;
use Laravel\Nova\Menu\MenuItem;
// ...
MenuItem::lens(User::class, MostValuableUsers::class)
```
### Dashboard Menu Items
You may also create a link to any of your [custom Nova dashboards](./dashboards) by calling the `dashboard` factory method:
```php theme={null}
use App\Nova\Dashboards\Main;
use Laravel\Nova\Menu\MenuItem;
// ...
MenuItem::dashboard(Main::class)
```
### External Link Menu Items
To create a link that directs the user to a location that is totally outside of your Nova application, you may use the `externalLink` factory method:
```php theme={null}
use Laravel\Nova\Menu\MenuItem;
// ...
MenuItem::externalLink('Documentation', 'https://nova.laravel.com/docs')
```
To specify an external link should open within a separate tab, you may call the `openInNewTab` method on your menu item:
```php theme={null}
use Laravel\Nova\Menu\MenuItem;
// ...
MenuItem::externalLink('Documentation', 'https://nova.laravel.com/docs')->openInNewTab();
```
You may also call the `method` helper to pass in the HTTP method, request data, and any HTTP headers that should be sent to your application when the link is clicked. This is typically useful for items like logout links, which should be `POST` requests:
```php theme={null}
use Laravel\Nova\Menu\MenuItem;
// ...
MenuItem::externalLink('Logout', 'https://api.yoursite.com/logout')
->method(
'POST',
data: ['user' => 'hemp'],
headers: ['API_TOKEN' => 'abcdefg1234567']
)
```
### Menu Item Badges
You may add visual badges to your menu item by calling the `withBadge` method on your `MenuItem` and specifying the options for the badge:
```php theme={null}
use App\Nova\Dashboards\Issue;
use Laravel\Nova\Menu\MenuItem;
use Laravel\Nova\Badge;
// ...
// Passing a string directly
MenuItem::dashboard(Issue::class)
->withBadge('New!', 'info')
// Passing a Laravel\Nova\Badge instance directly
MenuItem::dashboard(Issue::class)
->withBadge(Badge::make('New!', 'info'))
// Using a closure to resolve the value
MenuItem::dashboard(Issue::class)
->withBadge(fn() => 13, 'danger')
```
### Conditional Badges
You may also conditionally add badge only if the condition is met.
```php theme={null}
use App\Nova\Issue;
use Laravel\Nova\Menu\MenuItem;
// ...
// Passing a string directly
MenuItem::resource(Issue::class)
->withBadgeIf('New!', 'info', fn() => Issue::newModel()->count() > 0)
// Passing a Laravel\Nova\Badge instance directly
MenuItem::resource(Issue::class)
->withBadgeIf(Badge::make('New!', 'info'), fn() => Issue::newModel()->count() > 0)
// Using a closure to resolve the value
MenuItem::resource(Issue::class)
->withBadgeIf(fn() => 'New!', 'info', fn() => Issue::newModel()->count() > 0)
```
### Authorizing Menu Items
You may use the `canSee` method to determine if a menu item should be displayed for the currently authenticated user:
```php theme={null}
use Laravel\Nova\Menu\MenuItem;
use Laravel\Nova\Http\Requests\NovaRequest;
// ...
MenuItem::link('Cashier', '/cashier')
->canSee(function (NovaRequest $request) {
return $request->user()->can('manageCashier');
})
```
### Customizing the User Menu
Nova also allows you to customize the "user" menu found in the top-right navigation area. You can customize Nova's user menu by calling the `Nova::userMenu` method. This method is typically invoked within the `boot` method of your application's `App\Providers\NovaServiceProvider`:
```php app/Providers/NovaServiceProvider.php theme={null}
use Illuminate\Http\Request;
use Laravel\Nova\Menu\Menu;
use Laravel\Nova\Menu\MenuItem;
use Laravel\Nova\Nova;
// ...
/**
* Bootstrap any application services.
*/
public function boot(): void
{
parent::boot();
Nova::userMenu(function (Request $request, Menu $menu) {
if ($request->user()->subscribed()) {
$menu->append(
MenuItem::make('Subscriber Dashboard')
->path('/subscribers/dashboard')
);
}
$menu->prepend(
MenuItem::make(
'My Profile',
"/resources/users/{$request->user()->getKey()}"
)
);
return $menu;
});
}
```
By default, Nova is configured to display a "logout" link in the user menu. This link may not be removed.
Nova's user menu only supports `MenuItem` objects. Using `MenuSection` or `MenuGroup` inside the user menu will throw an `Exception`.
### Appending / Prepending to the Menu
You may call the `append` and `prepend` methods on a `Menu` instance to prepend or append new items to the. These methods are typically most helpful when customizing the user menu, since you often do not want to completely replace the existing menu:
```php app/Providers/NovaServiceProvider.php theme={null}
use Illuminate\Http\Request;
use Laravel\Nova\Menu\Menu;
use Laravel\Nova\Menu\MenuItem;
use Laravel\Nova\Nova;
// ...
Nova::userMenu(function (Request $request, Menu $menu) {
return $menu
->append(MenuItem::externalLink('API Docs', 'http://example.com'))
->prepend(MenuItem::link('My Profile', '/resources/users/'.$request->user()->getKey()));
});
```
## Menu Sections
Menu sections represent a top-level navigation item and are typically displayed with an corresponding icon representing the types of items in the menu. You can create a new menu section by calling the `MenuSection::make` method. This method accepts the name of the menu section and array of menu groups / items that should be placed within the section:
```php app/Providers/NovaServiceProvider.php theme={null}
use App\Nova\Dashboards\Sales;
use App\Nova\Lenses\MostValuableUsers;
use App\Nova\License;
use App\Nova\Refund;
use App\Nova\User;
// ...
Nova::mainMenu(function (Request $request, Menu $menu) {
return [
MenuSection::make('Business', [
MenuGroup::make('Licensing', [
MenuItem::dashboard(Sales::class),
MenuItem::resource(License::class),
MenuItem::resource(Refund::class),
MenuItem::externalLink('Stripe Payments', 'https://dashboard.stripe.com/payments?status%5B%5D=successful'),
]),
MenuGroup::make('Customers', [
MenuItem::lens(User::class, MostValuableUsers::class),
]),
]),
];
});
```
Instead of displaying a list of links, you may indicate that a menu section should just be a large, emphasized link to another location. To accomplish this, you may invoke the `path` method when defining the menu section:
```php theme={null}
use Laravel\Nova\Menu\MenuSection;
// ...
MenuSection::make('Dashboard')->path('/dashboards/main');
```
For convenience, if you are only creating a menu section to serve as a large, emphasized link to a Nova dashboard, you may invoke the `MenuSection::dashboard` method:
```php theme={null}
use App\Nova\Dashboards\Sales;
use Laravel\Nova\Menu\MenuSection;
// ...
MenuSection::dashboard(Sales::class);
```
Since you will often be creating links to Nova resources, you may use the `resource` method to quickly create a link to the appropriate path for a given resource:
```php theme={null}
use App\Nova\User;
use Laravel\Nova\Menu\MenuSection;
// ...
MenuSection::resource(User::class);
```
Similarly, you may create links to Nova lenses via the `lens` method:
```php theme={null}
use App\Nova\Lenses\MostValuableUsers;
use App\Nova\User;
use Laravel\Nova\Menu\MenuSection;
// ...
MenuSection::lens(User::class, MostValuableUsers::class);
```
Menu sections that are defined as `collapsable` do not support also being a link. Calling `path` on a menu section when it's `collapseable` will result in no link being shown.
### Menu Section Icons
You can customize the icon displayed for your menu section by invoking the `icon` method when defining the menu section:
```php theme={null}
use Laravel\Nova\Menu\MenuSection;
// ...
MenuSection::make('Resources', [
// items
])->icon('briefcase');
```
Nova utilizes the free [Heroicons](https://heroicons.com/) icon set by [Steve Schoger](https://twitter.com/steveschoger). Therefore, you may simply specify the name of one of these icons when providing the icon name to the `icon` method.
### Menu Section Badges
You may add visual badges to your menu section by calling the `withBadge` method on your `MenuSection` and specifying the options for the badge:
```php theme={null}
use App\Models\Issue;
use Laravel\Nova\Menu\MenuSection;
use Laravel\Nova\Badge;
// ...
// Passing a string directly
MenuSection::make('New Issues')
->path('/resources/issues/lens/new-issues')
->withBadge('New!', 'success')
->icon('document-text');
// Passing a Laravel\Nova\Badge instance directly
MenuSection::make('New Issues')
->path('/resources/issues/lens/new-issues')
->withBadge(Badge::make('New!', 'info'))
->icon('document-text');
// Using a closure to resolve the value
MenuSection::make('New Issues')
->path('/resources/issues/lens/new-issues')
->withBadge(fn () => Issue::count(), 'warning')
->icon('document-text');
```
### Conditional Badges
Using the `withBadgeIf` method, you may conditionally add a badge only if a given condition is met:
```php theme={null}
use App\Models\Issue;
use Laravel\Nova\Menu\MenuSection;
use Laravel\Nova\Badge;
// ...
// Passing a string directly...
MenuSection::make('New Issues')
->path('/resources/issues/lens/new-issues')
->withBadgeIf('New!', 'info', fn () => Issue::count() > 0);
// Passing a Laravel\Nova\Badge instance...
MenuSection::make('New Issues')
->path('/resources/issues/lens/new-issues')
->withBadgeIf(Badge::make('New!', 'info'), fn () => Issue::count() > 0);
// Using a closure to resolve the value...
MenuSection::make('New Issues')
->path('/resources/issues/lens/new-issues')
->withBadgeIf(fn() => 'New!', 'info', fn () => Issue::count() > 0);
```
### Collapsable Menu Sections
You may make your menu sections collapsable by invoking the `collapsable` method when defining the menu section. For convenience, Nova will remember the open state for the section between requests:
```php theme={null}
use Laravel\Nova\Menu\MenuSection;
// ...
MenuSection::make('Resources', [
//
])->collapsable();
```
## Menu Groups
Sometimes you may need another logical level between your menu sections and menu items. In this case, menu groups are the perfect solution. Menu groups allow you to group menu items under their own emphasized heading:
```php theme={null}
use App\Nova\Dashboards\Sales;
use App\Nova\License;
use App\Nova\Refund;
// ...
MenuSection::make('Business', [
MenuGroup::make('Licensing', [
MenuItem::dashboard(Sales::class),
MenuItem::resource(License::class),
MenuItem::resource(License::class),
MenuItem::externalLink('Stripe Payments', 'https://dashboard.stripe.com/payments?status%5B%5D=successful'),
]),
]);
```
### Collapsable Menu Groups
You may make your menu groups collapsable by invoking the `collapsable` method on the group. For convenience, Nova will remember the open state for the group between requests:
```php theme={null}
use Laravel\Nova\Menu\MenuGroup;
// ...
MenuGroup::make('Resources', [
//
])->collapsable();
```
## Menu Items
Menu items represent the different types of links to areas inside and outside of your application that may be added to a custom Nova menu. Nova ships with several convenience methods for creating different types of menu items.
First, to create a link to an internal area of Nova, you may call the `link` factory method on the `MenuItem` class:
```php theme={null}
use Laravel\Nova\Menu\MenuItem;
// ...
MenuItem::link('Cashier', '/cashier');
```
### Resource Menu Items
Since you will often be creating links to Nova resources, you may use the `resource` method to quickly create a link to the appropriate path for a given resource:
```php theme={null}
use App\Nova\User;
use Laravel\Nova\Menu\MenuItem;
// ...
MenuItem::resource(User::class);
```
#### Filtered Resource Menu Items
To create a link to a Nova resource with a predefined filter applied, you can use the `filter` method, passing in an instance of the filter and the value it should receive. Since filters can be used with multiple resources, you must also pass a name for the menu item, since it cannot be automatically generated:
```php theme={null}
use App\Nova\User;
use Laravel\Nova\Menu\MenuItem;
use \App\Nova\Filters\NameFilter;
// ...
MenuItem::filter('Filtered Users', User::class, NameFilter::make(), 'Hemp');
```
#### Using Multiple Filters With Filtered Resource Menu Items
You may also pass multiple filters to a resource menu item. For instance, let's imagine you wanted to create a menu item that linked to your `User` resource, showing users that have an email ending in `@laravel.com` and that also have a status of `active`:
```php theme={null}
use App\Nova\User;
use Laravel\Nova\Menu\MenuItem;
use \App\Nova\Filters\EmailFilter;
use \App\Nova\Filters\StatusFilter;
// ...
MenuItem::filter('Filtered Users', User::class)
->applies(EmailFilter::make(), '@laravel.com')
->applies(StatusFilter::make(), 'active');
```
#### Passing Constructor Parameters to Filtered Resource Menu Items
Nova filters may also receive constructor parameters to enable convenient re-use of your filters across resources. To pass the parameters when creating a filtered resource menu item, just provide them to the filter's `make` method:
```php theme={null}
use App\Nova\User;
use Laravel\Nova\Menu\MenuItem;
use App\Nova\Filters\ColumnFilter;
// ...
MenuItem::filter('Active Laravel Users', User::class)
->applies(ColumnFilter::make('name'), 'Hemp');
```
### Lens Menu Items
Similar to resource items, you may create links to Nova lenses via the `lens` method:
```php theme={null}
use App\Nova\Lenses\MostValuableUsers;
use App\Nova\User;
use Laravel\Nova\Menu\MenuItem;
// ...
MenuItem::lens(User::class, MostValuableUsers::class)
```
### Dashboard Menu Items
You may also create a link to any of your [custom Nova dashboards](./dashboards) by calling the `dashboard` factory method:
```php theme={null}
use App\Nova\Dashboards\Main;
use Laravel\Nova\Menu\MenuItem;
// ...
MenuItem::dashboard(Main::class)
```
### External Link Menu Items
To create a link that directs the user to a location that is totally outside of your Nova application, you may use the `externalLink` factory method:
```php theme={null}
use Laravel\Nova\Menu\MenuItem;
// ...
MenuItem::externalLink('Documentation', 'https://nova.laravel.com/docs')
```
To specify an external link should open within a separate tab, you may call the `openInNewTab` method on your menu item:
```php theme={null}
use Laravel\Nova\Menu\MenuItem;
// ...
MenuItem::externalLink('Documentation', 'https://nova.laravel.com/docs')->openInNewTab();
```
You may also call the `method` helper to pass in the HTTP method, request data, and any HTTP headers that should be sent to your application when the link is clicked. This is typically useful for items like logout links, which should be `POST` requests:
```php theme={null}
use Laravel\Nova\Menu\MenuItem;
// ...
MenuItem::externalLink('Logout', 'https://api.yoursite.com/logout')
->method(
'POST',
data: ['user' => 'hemp'],
headers: ['API_TOKEN' => 'abcdefg1234567']
)
```
### Menu Item Badges
You may add visual badges to your menu item by calling the `withBadge` method on your `MenuItem` and specifying the options for the badge:
```php theme={null}
use App\Nova\Dashboards\Issue;
use Laravel\Nova\Menu\MenuItem;
use Laravel\Nova\Badge;
// ...
// Passing a string directly
MenuItem::dashboard(Issue::class)
->withBadge('New!', 'info')
// Passing a Laravel\Nova\Badge instance directly
MenuItem::dashboard(Issue::class)
->withBadge(Badge::make('New!', 'info'))
// Using a closure to resolve the value
MenuItem::dashboard(Issue::class)
->withBadge(fn() => 13, 'danger')
```
### Conditional Badges
You may also conditionally add badge only if the condition is met.
```php theme={null}
use App\Nova\Issue;
use Laravel\Nova\Menu\MenuItem;
// ...
// Passing a string directly
MenuItem::resource(Issue::class)
->withBadgeIf('New!', 'info', fn() => Issue::newModel()->count() > 0)
// Passing a Laravel\Nova\Badge instance directly
MenuItem::resource(Issue::class)
->withBadgeIf(Badge::make('New!', 'info'), fn() => Issue::newModel()->count() > 0)
// Using a closure to resolve the value
MenuItem::resource(Issue::class)
->withBadgeIf(fn() => 'New!', 'info', fn() => Issue::newModel()->count() > 0)
```
### Authorizing Menu Items
You may use the `canSee` method to determine if a menu item should be displayed for the currently authenticated user:
```php theme={null}
use Laravel\Nova\Menu\MenuItem;
use Laravel\Nova\Http\Requests\NovaRequest;
// ...
MenuItem::link('Cashier', '/cashier')
->canSee(function (NovaRequest $request) {
return $request->user()->can('manageCashier');
})
```